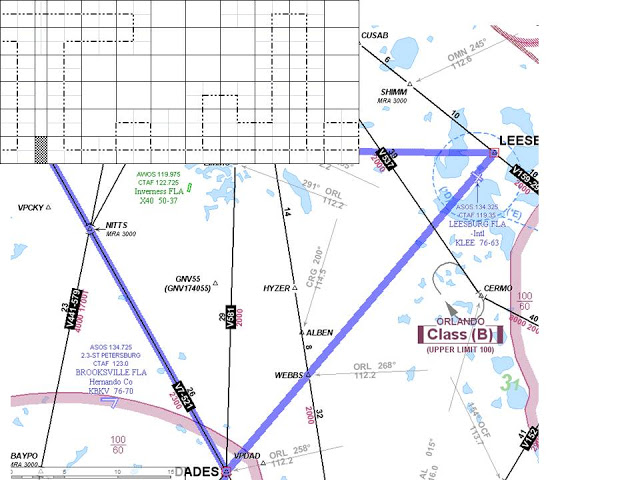
Skywriting Results

The weather was slightly better today.  But still not good enough for regular VFR flying.  The ATIS showed Winds 310 @ 8, Overcast layer @ 300 FT.  The only good news was that the fog and low clouds were expected to burn off later in the day.  We reviewed the plan and waited for some weather improvement. Our improvised flight plan was as follows:

We had every turn mapped out and by the time we were ready to go, the weather had improved to 500 Overcast.  Since that was still not that great, I filed IFR and we took off northbound.  After breaking out on top of the clouds between 5000 and 6000FT we canceled IFR and began to get in position, which was ~ 10 miles west of Crystal River @ 6500 FT on a heading of 090.
My copilot Joe did a great job of calling out headings and distances.  I was trying to focus on making steep coordinated turns with the R9 Vector mode.  My R9/STEC ‘s configuration tends to make roughly standard rate turns.  However, for this exercise, we needed much sharper turns.  So I made the turns by hand at ~ 45 degrees of bank and then used the R9 vector mode to hold my heading in order to get straight lines.  This was particular challenging due to the 23 knot winds from the west.

Soooo…. Here is the resulting GPS track:

As you can see, we made a couple of mistakes (the top of the “T” and the bottom of the “J”).  In hindsight, we realized that these were errors in planning rather than errors in flying.  In addition, I am still learning how to import/embed Google Maps, which is is why the last period is shown in a different format on the map.  But overall, we were satisfied and it was time to head home.
Unfortunately, mother nature would not give us a break.  The cloud deck below us was absolutely solid.  We had to get an IFR clearance and fly the GPS 23 Approach @ Tampa Executive Airport down to within 100 FT of minimums!  This was the first time Joe got to experience a real approach in IMC and he seemed quite relieved when we landed.
So while it was not exactly as intended, we still declared “MISSION ACCOMPLISHED”!
Cheers,
== T.J.==

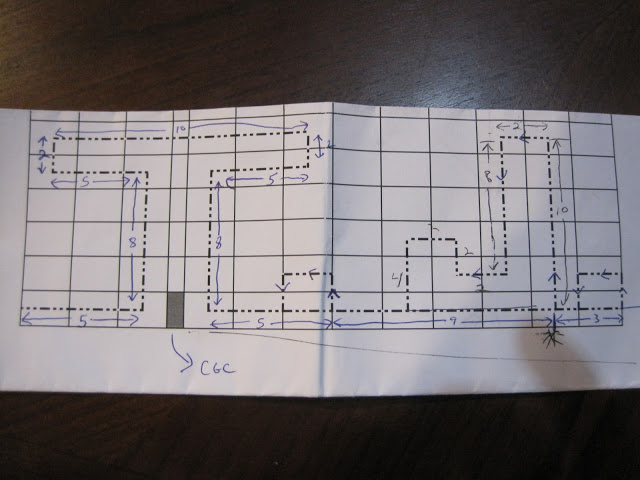
Planning For A First Attempt At Skywriting

After reading several of Steve Dilullo’s posts, I feel inspired to try something a bit different this weekend.  His post about ribbon cutting has quite cool.  But I fly a Cirrus and I can’t “just open the window” to try ribbon cutting.  However, his post about skywriting really got me thinking.  I wanted to give skywriting a try and see just how hard it really was.
First, I had to figure out the equipment needed to log the GPS track.  This part should be EZ.  But there were several ways I could think of to do it:
Plan A was to use the basic features of the Avidyne R9 that allow you to download flight details (including GPS data) to a USB stick.  This data (in KML format) can then be pulled into Google Earth.
Plan B was to use the free “GPS Tracker” app on the iPhone.  I have never tried this before.  But it sounds promising.  Allegedly, this app monitors your GPS track, including altitude, at user defined intervals (10 seconds, 20 seconds, etc) and creates a regular interactive Google map of the track.
Plan C was to have my buddy Joe bring along an external hand held GPS tracker.  This would also result in a KML file that can be pulled into Google Earth.
I will probably try all three plans and check out the results.  However, Plan B seems the most appealing to me.  With an interactive Google map, you can easily embed that anywhere.  Unfortunately, Google Earth doesn’t let you do that…  Or at least I don’t know how 😉
Next, on to planning the route itself.  Unlike the Merry Christmas track in Steve’s post, for my first attempt, I wanted to try a much simpler version.  Instead of big words in cursive, I was planning to try just a couple of letters in capital, bubble letters.  The planning was harder than I thought.  I needed to find an airspace that was not crowded, had no Class B,C,Ds, or MOAs, of which there are many in FL.  I decided to go just north of the Tampa Class B, around Crystal River, FL. Since I didn’t know how well the iPhone GPS would work at higher altitudes, I decided to stay relatively low 3500 FT, where the reception should be pretty good.
Here is what I came up with:

The picture shows straight lines and edges instead of bubble letters… Obviously, the real thing will be rounded edges on the actual GPS track and the result should be real bubble letters.
As far as “how” to fly the route, I needed to get creative.  If I simply flew it by hand, I suspect the finished product would be a bit sloppy.  My Excel planning file, shows me just how precise I need to fly this to have a successful finished product.  So I decided to use the “Vector” Mode of the R9 combined with my STEC autopilot to help me out.
As some of you know, Avidyne’s new digital autopilot the DFC100 is now available and I am planning to have it installed next month (Can’t wait).  The DFC100 would be even better for this exercise.  For kicks, I may try to repeat this exact exercise next month with the new autopilot and post a side by side comparison.
But for this weekend, I will try it with the STEC first.  “Vector” Mode is the key (I think)…
So that’s the plan … This weekend, I will try it for real and see how close I come to the plans.  Regardless of how it turns out (good, bad or ugly), I plan to post the resulting GPS track on Sunday night!
Stay tuned…
== T.J.==